All the basics about LED settings in reWASD
The sun is a lightbulb, and so are your LEDs. You might have heard about the LED customization options in reWASD 5.5, but have you tried them yet? If you haven’t, this blog post will get you started: you can tweak the LED on PS4 controller, DS3, PS3 Navigation, Nintendo, Steam controllers and Razer keyboards and mice. So if you are a lucky owner of one of the devices listed above, keep reading ;)
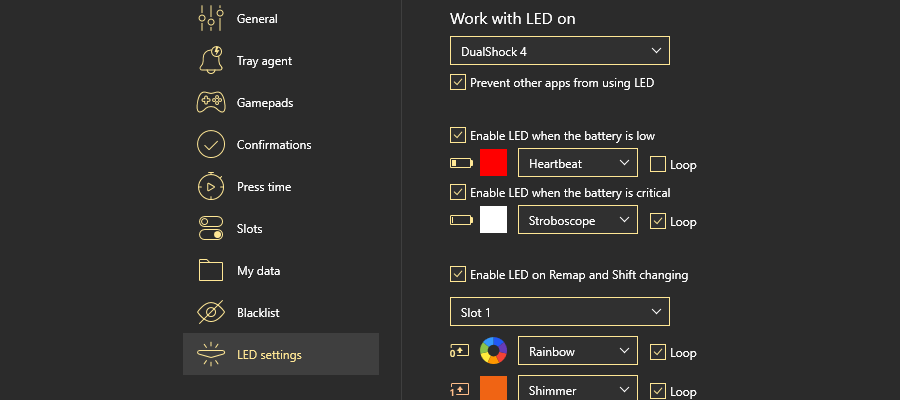
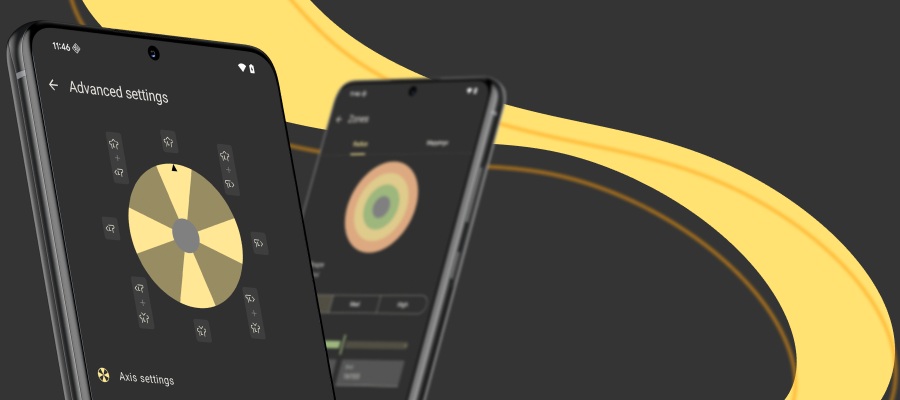
There are two ways on how you can change the LED settings, whether in Preferences — LED settings (those apply to any LED-supported device that you remap), or inside the config (these settings override the settings you have in preferences). Also, to enable LED reWASD Tray Agent should be running.
Keep in mind that to change the LED settings in the config, you need to pick the specific device that you want to change the settings for as an active device.
Let’s talk a bit about how changing LED settings can assist you while you remap the device in reWASD. First of all, you can customize the LED behavior for different Slots and Shift layers, which makes the currently active layout recognizable. You can set different colors (for LED on PS4 controller and Razer keyboards and mice), or different color intensity (for the LED on Steam controller). Apart from that, you can choose different modes (for DS4, Steam controller, and Razer keyboards and mice LEDs). Here’s how the existing modes work:
Solid glow

Shimmer

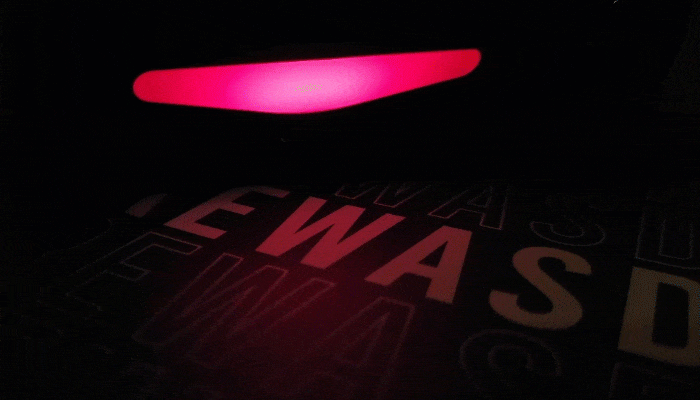
Heartbeat

Stroboscope

Rainbow
Any color you like: LEDs on DS4 controller and Razer keyboards and mice
When it comes to the colorful LEDs, the default settings are the following: each one of the Shift layers will light up a correspondent color when a certain layer is active. The modes are different for all the slots. The settings inside the config replicate the default ones, and if you modify them, they will override the settings from Preferences — LED settings. Also, set up the LED on PS4 controller to light up in a specific way when the battery is low and critical, so you don’t get dragged out midgame because your controller died.
Razer devices require Chroma Connect installed in Synapse for the LED setting to apply properly, so make sure to check it before testing LED settings.
For all the DualShock 4 owners, we have made a custom dark mode LED PS4 controller config. It’s also showing you the active shift layers, but way darker then the default settings. So if you usually play when the sun went down already, this one will come in hand :)
There’s a tricky thing about the color, what you pick in reWASD can differ from what actually lights up on the device. So make sure to test to find a perfect shade!
Changing the LED on Steam controller
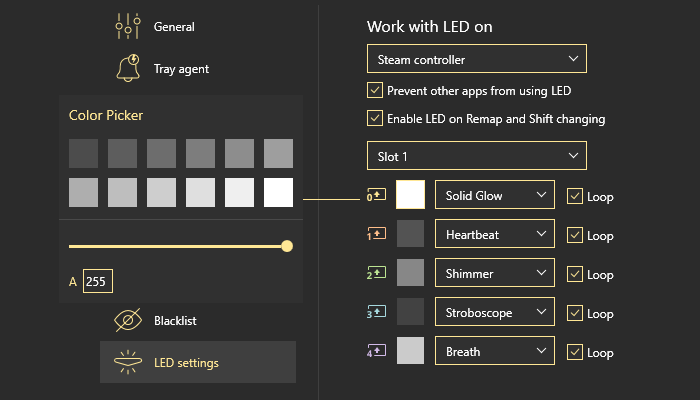
Yeah, we know that it’s monochrome and hardware specifics do not permit choosing a color. But who said that it’s impossible to make it light up in a certain way to differ the layouts? You can choose any shade of grey (from the palette or manually with a slider) to adjust the intensity, and choose the mode of how it will light up. This will help you differ which Shift layer or Slot is currently active.
DualShock 3 and Nintendo player LEDs
Make sure to try an option for Player LEDs to light up the LED in accordance with an active Slot (for DS3 and Nintendo controllers). Nintendo Switch Pro and DualShock 3 have them on the front panel, between bumpers and triggers; Nintendo Joy-Cons have the Player LEDs on the inner part of each Joy-Con, and if you put them together in a grip, you will see them on the front part of the grip.
Player LEDs are the 4 indicators that display what player you are when the gamepad is connected to the console.
Last but not least, PS3 Navigation controller: it has one red indicator, that you can set to light up when Remap is ON, when the controller is connected, or turn it off completely.
You also can turn off LEDs completely for all the devices: proceed to Preferences — LED settings, choose the device you want to turn LEDs off for, and deactivate all the settings for it. Then, when a certain config is chosen, click on the LED icon near the name of the config, and choose None for all the settings. This way, when you Apply the config, LEDs won’t shine.
We hope that this blog post will help you remap Steam controller without Big Picture and use all the features for your own good. If you have any questions, don’t hesitate to reach out to us wherever you feel comfortable: Discord text chat, on Facebook, or on reWASD Forum. Make sure to follow us on Pinterest, Reddit, and YouTube to keep your hand on the pulse.
You may also like

How to Use Gyro Controls on PC
Summer Is Fading… But We’re Just Getting Started